Categories
Tech

How to Automatically Create Notion Cards from Salesforce Cases

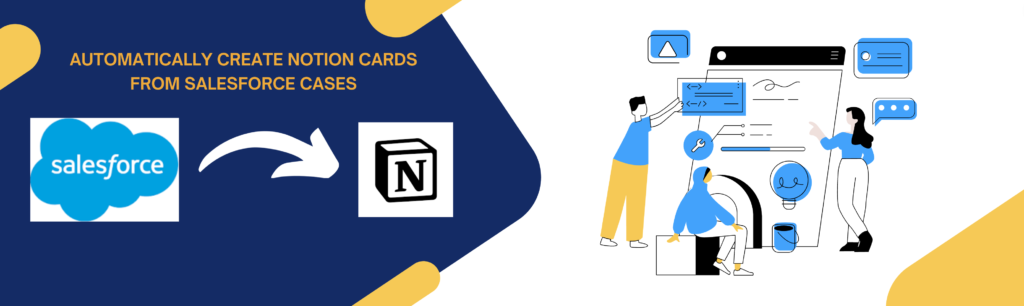
This script syncs Salesforce Cases into Notion, allowing for easier sprint planning and providing visibility to users who may not have access to Salesforce. It requires a Python environment, the Python File package, Salesforce access, and a Notion account. The script also requires familiarity with setting up a Python environment and creating a Salesforce Connected App. With this script, users can save time and streamline their workflow by consolidating their work into one platform.

What you will need:

  • Python Environment (local)
  • The Python File package (GitHub Repo)
  • Salesforce access
    • Admin permission, or at least the permission set to create a Connected App)
    • Service Console with Cases
  • A Notion account

Setting up a Python Environment:

If you need to set up a Python environment for the first time, you can follow my guide on setting up Python and VSCode. There are also several excellent resources that you can use to help with this process. I recommend ChatGPT for any command line errors during the setup process.

Install the needed Modules into Visual Studio Code

You must add the following modules to your environment to run this code. If everything was installed correctly within VSCode, you should be able to run these code snippets as they are shown within your terminal:

pip install simple-salesforce
pip install requests
pip install pandas

Creating the Salesforce API Connection:

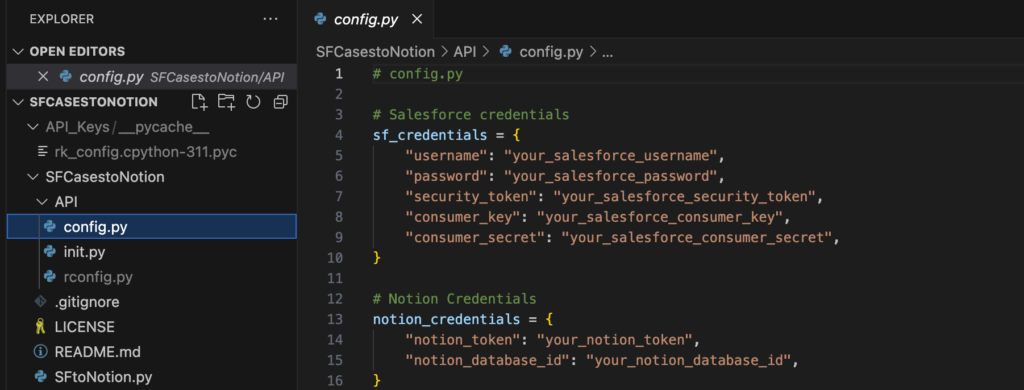
For this script to work, you will need to authenticate with Salesforce. Here is what you will need from Salesforce:

YOUR_SALESFORCE_USERNAME: Your Salesforce username.

YOUR_SALESFORCE_PASSWORD: Your Salesforce password.

YOUR_SALESFORCE_SECURITY_TOKEN: Your Salesforce security token.

YOUR_SALESFORCE_CLIENT_ID: The client ID of your Salesforce Connected App.

YOUR_SALESFORCE_CLIENT_SECRET: The client secret of your Salesforce Connected App.

Your Username and Password are the same that you would use at login.salesforce.com, so I’ll move on to the Security Token.

Obtaining your Salesforce Security Token

In Salesforce, the security token is typically sent to you via email when you first set up your Salesforce account or when you reset your security token. If you need to obtain or reset your security token, you can follow these steps:

  1. Log in to Salesforce: Open your web browser and log in to your account.
  2. Access Your User Settings:
    • Click on your profile picture in the upper-right corner.
    • Select “Settings.”
  3. Navigate to the Reset My Security Token Page:
    • Click “Reset My Security Token” in the left sidebar under “My Personal Information.”
    • If you can’t find it, you can also use the quick find box at the top of the setup menu to search for “Reset My Security Token.”
  4. Reset Security Token:
    • Click the “Reset Security Token” button.
    • Salesforce will send you an email with the new security token.
  5. Check Your Email:
    • Open the email from Salesforce.
    • The email subject should be “Your new Salesforce security token.”
  6. Copy the Security Token:
    • Copy the security token from the email.

Creating a Salesforce Connected App:

Finally, to obtain the ‘client_id’ and the ‘client_secret,’ you must create a Connected App in Salesforce. You may already have one that you use for API connections, but here are the instructions just in case:

  1. Log in to Salesforce: Open your web browser and log in to your account.
  2. Access Setup:
    • Click on the gear icon in the upper-right corner.
    • Select “Setup” from the dropdown menu.
  3. Navigate to App Manager:
    • Type “App Manager” in the quick find box in the left sidebar.
    • Click on “App Manager.”
  4. Create a New Connected App:
    • Click the “New Connected App” button.
    • Fill in the required information:
      • Connected App Name: Choose a name for your app.
      • API Name: This will be automatically generated based on the name.
      • Contact Email: Your email address.
      • Enable OAuth Settings: Check this box.
      • Callback URL: Enter a valid URL (e.g., https://localhost If you will only run this on your local machine)
      • Selected OAuth Scopes: Add at least “Access and manage your data (API)” and other scopes you need.
  5. Save the Connected App:
    • Click “Save.”
    • After saving, you will be taken to the details page for your Connected App.
  6. Retrieve client_id and client_secret:
    • On the details page, look for the “Consumer Key” (this is your client_id) and “Consumer Secret” (this is your client_secret).
    • Click on the “Click to reveal” link next to the “Consumer Secret” to view and copy your client_secret.

Once you have this information, add it to the config.py file within the cloned repo.

Creating a Notion API Connection:

Next, you need to use the Notion API to create the cards. The Notion API allows you to programmatically interact with Notion databases, pages, and other elements. Here are the general steps you can follow to create a Notion card:

  1. Set Up a Notion Connection:
    • Go to the Notion Integrations page: https://www.notion.so/my-integrations
    • Click on “Create a new integration” to create a new integration.
    • After creating the integration, you’ll get an Integration Token. Save this token securely, as it will be used to authenticate your requests to the Notion API.
  2. Get Notion Database ID:
    • Open your Notion workspace and navigate to the database where you want to create cards.
    • Click on the “Share” button at the top-right of the database.
    • Click on “Copy link” to copy the link to the database. The link will contain the database ID, which will be a 32-character string of numbers and letters
  3. Add those parameters to your config.py file
  1. Install Notion SDK:
    • Install the notion-sdk-py Library a Python client for the Notion API. You can install it using:
pip install notion-sdk-py

Authorize the Integration to Run in your Notion Database

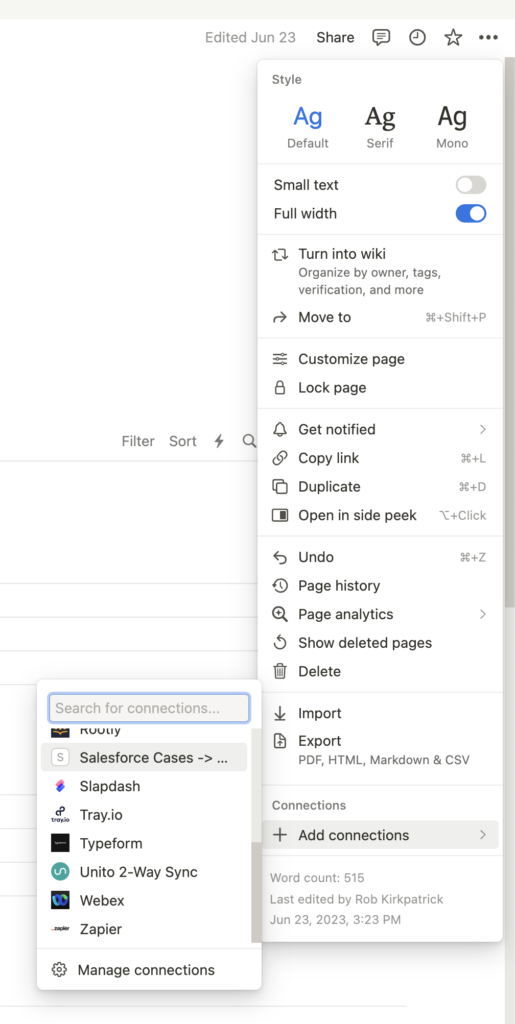
Even though you’ve created a database where you want the cards to be created, you need to allow the integration to run in Notion. You do that by:

  1. Going to your Notion page
  2. Clicking the …
  3. Click “+ Add Connections”
  4. Find the Connection you created above

Edit the SOQL Query in Salesforce

I have this code to pull only the Active Cases with their Description and Name. You may want to revise this code and change it if you need any more information (line 32)

query = "SELECT Id, CaseNumber, Subject FROM Case WHERE Status = 'New'"

If you do add anything to the query, you’ll need to map it to the Notion card as well (lines 46-51)

"properties": {
            "title": [{"text": {"content": title}}],
            "Description": [{"text": {"content": description}}],
        },
    }

Running the Code

Once these steps are completed, you can click the ▶️ icon and run your code. You should see the Cases get created in the terminal window.

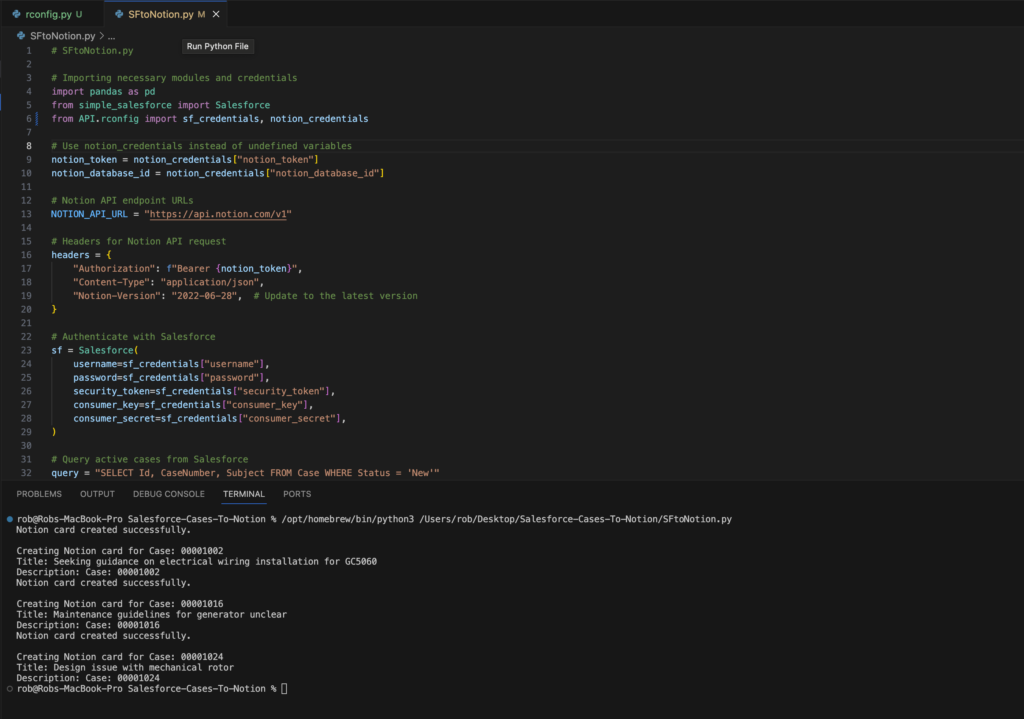
Running the code in VS Code

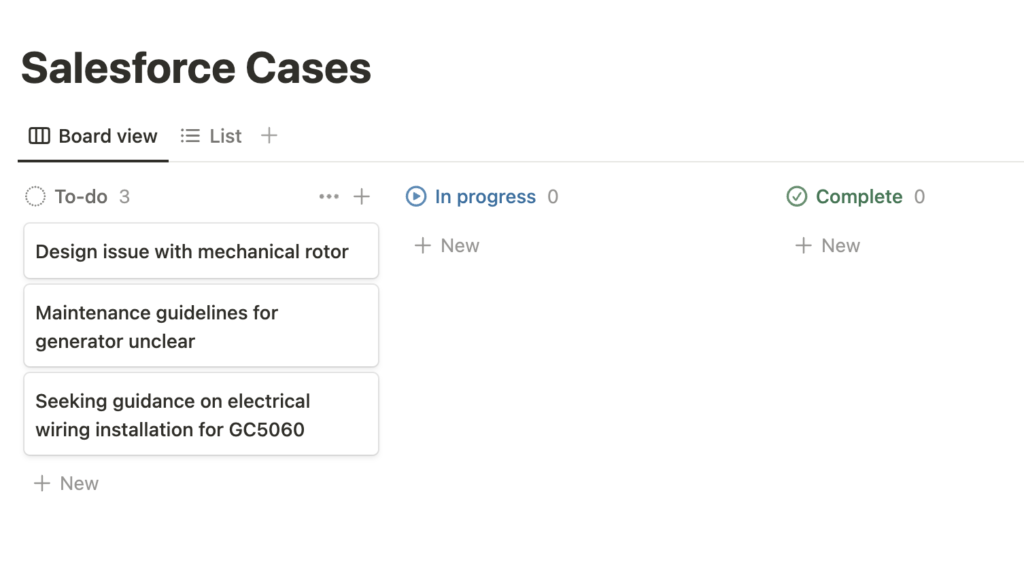
The Cases created in Notion

Wrap up

Now that the Cases are syncing into Notion, you should look to edit the SOQL Query so that the next time you run this code, it only returns cases that are newly created. You could do that by changing the query to add some time constraints like this:

"SELECT Id, CaseNumber, Subject FROM Case WHERE Status = 'New' AND CreatedDate >= TODAY"

Let me know if you implement this code into your workflow and how you would improve it!

Categories
Tech

How to Set-Up a Python Environment on Mac

For this tutorial, I’ll walk you through the process I completed on my MacBook with VSCode. There are dozens of other Python environments (IDE’s) that you can use, and of course, you can use your Windows machine (as much as my inner Apple fan-boy doesn’t want you to).

Be sure to read the pages linked and follow the instructions carefully as not every code sample can be copied and pasted directly into your terminal to get everything installed.

VSCode installation

PATH set-up

Once you’ve installed VSCode and set-up your PATH, open a new terminal window in VSCode

Next you’ll want to Install Homebrew.

Homebrew is a package manager for macOS that simplifies the process of installing, updating, and managing software on your Mac in the terminal.

/bin/bash -c "$(curl -fsSL https://raw.githubusercontent.com/Homebrew/install/HEAD/install.sh)"

Once that finishes, don’t neglect the two steps displayed in the terminal. You’ll need to run two commands which can be copied and pasted, and then run by hitting “return”

Everything that is displayed on the first line that looks like the code below (you’ll see your home directory after the “>>” make sure that you copy that too.)

(echo; echo 'eval "$(/opt/homebrew/bin/brew shellenv)"') >> <your home directory> 

Everything on the second line

eval "$(/opt/homebrew/bin/brew shellenv)"

Once you have that set-up, head over to this VS Code guide to Install Python into your IDE.

I do like to complete the “Hello World” Tutorial on a fresh build, but you by no means need to do so.

Upgrade pip

python3 -m pip install --upgrade pip

Be sure to check your version of Python when running this command. (It works as of 12.28.23)

You should be all set and ready to begin working with Python in VSCode on your Mac.

Categories
AI Tech

Add ChatGPT to DBeaver

If you use DBeaver as your SQL IDE, here’s how to add AI right now

What you need

  • DBeaver on version 22.3.5 or higher
  • An OpenAI account and a new API key

Set-Up

Download DBeaver Community Edition https://dbeaver.io/download/

Register for an OpenAI account if you don’t currently have one https://auth0.openai.com/u/signup/

Install DBeaver

Create sample database

You can also access this test database tool through Help > Create Test Database.

“Wait, why do I need the sample database?”

I assume you don’t have a huge personal database ready to go, so save yourself the trouble and have DBeaver spin one up for you.

Another thing to consider before actually using this tool to help you code is that your table header and column names will be sent to OpenAI to help you code. If you or your org have security concerns about this – you probably can’t use this tool with your job.

So instead, create the sample database so you can use the AI without security concerns.

Installing the ChatGPT Add-on

Click Help > Install New Software

In the “Works with” section, type: “DBeaver” and you should see “DBeaver AI” appear in the section below.

Follow the on-screen prompts and restart DBeaver

Open the sample database and press F3

You should see the OpenAI logo to the left of the SQL editor

Click the ChatGPT logo to launch the API and settings window

Go to your OpenAI account and generate a new key and paste it into the API token field

Click “Apply and Close”

Using the Tool

Click the ChatGPT icon again

You will get a prompt asking permission to read the table header and columns. As mentioned above, if you’re not using the sample database, be sure you’re okay with this before proceeding.

With that, you’re off and running…

ChatGPT Output:

SELECT COUNT(*) FROM Album;

Chat GPT Output:

SELECT Genre.Name, COUNT(InvoiceLine.InvoiceId) AS 'Number of Customers'
FROM Genre
INNER JOIN Track ON Genre.GenreId = Track.GenreId
INNER JOIN InvoiceLine ON Track.TrackId = InvoiceLine.TrackId
GROUP BY Genre.Name
ORDER BY COUNT(InvoiceLine.InvoiceId) DESC;

Troubleshooting

Don’t see the OpenAI icon.

  • If you don’t see the icon, confirm that the editor is allowed to run
    • Click Window > Preferences > Editors > AI (ChatGPT)
  • Ensure that “Enable smart completion” is checked.

Don’t have the DBeaver AI package available to install

  • Ensure the DBeaver is updated
    • Help > Check for Update
  • Manually Add the package
    • Click Help > Install New Software > Add
Categories
AI

AI Image Generator

Using Open AI’s image generator

This tutorial explains how to use Open AI’s image generator to create stunning images using Visual Studio Code (VSCode) and Python. I’ll walk you through the process, including how to set up a Python environment, install OpenAI, generate an API key, and use the image generation script. With a few simple steps, you can be up and running in no time, creating and manipulating images with the power of Open AI’s image generator and Python. Have fun and get creative!

Start here if you do not have a Python environment set up already.

I already have a python environment.

For this tutorial, I’ll walk you through the process I completed on my MacBook with VSCode. There are dozens of other Python environments that you can use for this, and of course, you can use your Windows machine (as much as my inner Apple fan-boy doesn’t want you to). Be sure to read the pages linked and follow the instructions carefully as not every code sample can be copied and pasted directly into your terminal to get everything installed.

VSCode installation

PATH set-up

Once you’ve installed VSCode and set-up your PATH, open a new terminal window in VSCode

Install Homebrew.

/bin/bash -c "$(curl -fsSL https://raw.githubusercontent.com/Homebrew/install/HEAD/install.sh)"

Once that finishes, don’t neglect the two steps displayed in the terminal. You’ll need to run two commands which can be copied and pasted, and then run by hitting “return”

Everything that is displayed on the first line that looks like the code below (you’ll see your home directory after the “>>” make sure that you copy that too.)

(echo; echo 'eval "$(/opt/homebrew/bin/brew shellenv)"') >> <your home directory> 

Everything on the second line

eval "$(/opt/homebrew/bin/brew shellenv)"

Installing Python

I do like to complete the “Hello World” Tutorial on a fresh build, but you by no means need to do so.

Upgrade pip

python3.11 -m pip install --upgrade pip

Getting Started with OpenAI

Register for an Open AI Account (if you don’t have one already)

Return to VSCode and Install “OpenAI”

Note: If you’ve set up your environment differently than the steps I outlined above, this input may be different for you

python3 -m pip install openai 

Copy the example code from Open AI (make sure you use the Python script)

import os 
import openai 
openai.organization = "org-Rw9He2WlfsUmXrXLU27JLuPK" openai.api_key = os.getenv("OPENAI_API_KEY") openai.Model.list() 

Two edits I made to this code:

  • Comment out ‘openai.organization’ as I don’t have an Org ID currently
    • If you do sign up for a Team Open AI account, you should update this “org_id”
  • The method that this code is using above is attempting to store your API key in a variable. This is more secure, however since I am the only one using this file, I hardcoded the API key
    • USE CAUTION WITH THIS METHOD IF SHARING THIS SCRIPT WITH OTHERS

The resulting code with edits looks like the following

import os 
import openai 
#openai.organization = "YOUR_ORG_ID" 
openai.api_key = 'YOUR_API_KEY' 
openai.Model.list() 

Generate an API Key in your OpenAI account. Copy and paste that key in between the ‘ ’ in the above code

If you can run this code without an error, you have successfully authenticated and retrieved the Model List

One more change to the code:

  • Comment out ‘openai.Model.list()’ as this is not required for image generation

Retrieve the image generation script from OpenAI

response = openai.Image.create( 
prompt="a white siamese cat", 
n=1, 
size="1024x1024" 
) 
image_url = response['data'][0]['url']

I made another edit for ease of displaying the link

print(response)

Altogether, your code should look like the following (don’t forget to update your API key)

import os
import openai
#openai.organization = "YOUR_ORG_ID"
openai.api_key = 'YOUR_API_KEY'
#openai.Model.list()

#response = openai.Image.create(
  prompt="a baby panda",
  n=1,
  size="1024x1024"
)
image_url = response['data'][0]['url']

print(response)

‘n’ refers to the number of images you would like to generate. This will accept a value from 1-10

‘size’ corresponds to the image dimensions you would like. You can choose between:

  • 256 x 256
  • 512 x 512
  • 1024 x 1024

Generating Images

Now that you have your code compiled, all that’s left is to try it! Get started with the ‘prompt’ by adding your idea in between the “ “ on line 8

prompt = "your great idea here"

Things to Note

  • The images that you generate are only accessible via the URL for one hour, so if you love something, make sure that you download it
  • You have a limited number of calls that you are allotted on your OpenAI account. You can track how many you’ve made here.
  • Another fun use of AI; you can have this code explained to you by pasting it into OpenAI’s chatbot or Denigma (I’ll give them a shout-out since they were my first tool for using AI for code description –
  • Don’t forget that you can use Chat GPT to improve this code. One noticeable improvement would be to have the URL shortened and made easier to open in a web browser.

My favorite image so far

prompt = "a baby panda"
AI-Generated image of a baby panda
Categories
AI

How to backpack the Uncompaghre Wilderness

How to Backpack Uncompahgre: 5 Tips for the First-Time Backpacker

Making the 5+ hour drive just to make it to the trailhead in the Uncompahgre Wildnerness may seem like a daunting task, but I guarantee that it is more than worth it. The drive alone will take you through areas that most Colorado tourists, and residents, never see. The irony? I would argue that west of the Contenital Divide is quintensial Colorado. Iconic landmarks Black Canyon in Gunnison National park, and driving over Monarch Pass. and let’s not forget that if you’re that far west Telluride and Grand Junction aren’t much farther. Let’s talk about the best ways for you to get back into this incredible wildnerness.

How to get to the Uncompahgre Wildnerness

Trailheads for the Uncompahgre can be found all around the small town of Ouray. While a lot of these trails are hiking only, some of the best treks start from Breckenridge, as the Uncompahgre can be accessed right from the Summit. But for our purposes we will be focusing on the area that hugs the western slopes of Telluride and El Jardin. Below you will find a detailed map outlining the trails in the backcountry. You can pick your favorite from our list, or add them if you think they deserve to be included. Trailheads in the Westside (The Area Near Telluride): Cottonwood Trail (A small detour on Lone Tree Trail) Cottonwood Pass (The Big Y and pretty amazing views) Mammoth Trail (Follow the old trail to a campsite near the Cottonwood Pass Trail.

Traveling Tips

1. If you want to start your tour before lunch, choose a hike along the Berdoo Loop. The sign-posting along this trail is relatively good, and the parking lot is close by. However, the trail is on a ridge that is also a creek, so be sure to carry lots of water (otherwise you’ll have to “punch-through” a waterfall) and be ready to take a dip in the Colorado River if you’re in the mood. The trail climbs on for a while and I actually took this trail with a group of Frenchmen from Brittany, and the men were simply un-matchable with their tenacity. They followed the trail like it was a hiking death-trip. In general, they would continue to look back, thinking they were far away from our group, but I knew that they could still see us.

What to Pack

1. Shoes and Heels Now, this might seem obvious, but I am going to stress this point. Yes, you will be hiking a good three to four hours, so make sure that you have a pair of shoes with traction, so that you don’t get hurt in some rocky areas. I know hiking in Chacos and flip flops sounds like a lot of fun, but I assure you that it won’t be. Now if you can’t wear heels, they should be pretty easy to come by. Check out some of my best-selling boot finds below. Brand: Merrell Description: The Westin Kennedy Sandals are ultra flexible, and also super easy to put on and take off. They are sandal compatible and great for wet and muddy conditions. I absolutely adore them. Stretch: 5″ Stratus Stretch Weight: 1.35 oz (38-40 cl) Color: Smoke Style: Women’s 2.

What to Eat

One of the most common concerns in my area is finding nutrition food that isn’t only tasty, but contains a healthy dose of essential vitamins and minerals. When traveling with kids in particular this can be a challenge. “Whole,” natural foods are the best foods to eat. Seeds Seeds are a great source of calories, protein and dietary fiber, making them a great source of calories. Seeds also contain high levels of phytonutrients that aid in improving your immune system, along with providing antioxidants. These help to reduce the impact of outdoor temperatures, and increase your overall resistance to stress and pain. Kale There is no better source of protein in the wilderness than kale. Kale has more protein per ounce than almost any other vegetable.

What to Do

If you’re a winter camper, the challenge is to embrace all the seasons of the year. Good news, we know some good hiking. If you want to try for a big day, pack a big pack and go for a hike. If you are looking to spend a night and set up camp for the night, grab a permit. In recent years there has been an increasing number of permit parking areas. If you are a skilled backpacking backpacker, a series of short hikes and side trips will be more than enough to see this area to its potential. On my next trip I’m hoping to do the full mountain range in a single trip, but that’s up to me. While I personally love doing the big loop around the mountain range, there are many places you can stop for a day hike, or even an overnight.

Conclusion

The Uncompahgre Wildnerness is a place that needs to be preserved. A place with wild trout streams, majestic redrock canyons, and gentle meadows. While you can’t say it is easy to get into the Uncompahgre Wildnerness, it is a special place. If you’re looking for an opportunity to get in there, I think these tips are something to consider. At the end of the day, you get to appreciate the wild beauty of the Uncompahgre. With a little planning and some grit you can find the adventure that awaits. #Wildtopia #WildlifeMonarchTrout #ColoradoTrout A small guide to the Wildnerness and hiking the Rogue Canyon Trail Location: The Uncompahgre Wildnerness is located north of Ouray, about 7 miles west of the town of Telluride.